Today’s post is the Elfa Shelves Product Review PLUS. The Container Store’s Elfa Shelf system has been around for years. What I like about it is:
- The simplicity of installation
- The variety of options
Despite the variety of options, I actually just need their most basic option, new shelves in my home office closet. The plus in the title is a how-to instruction on not only hanging the Elfa Shelves but how-to do any organizing system. So I’m actually going to start with some organizing systems basics.
Step 1: Prioritize To Organize
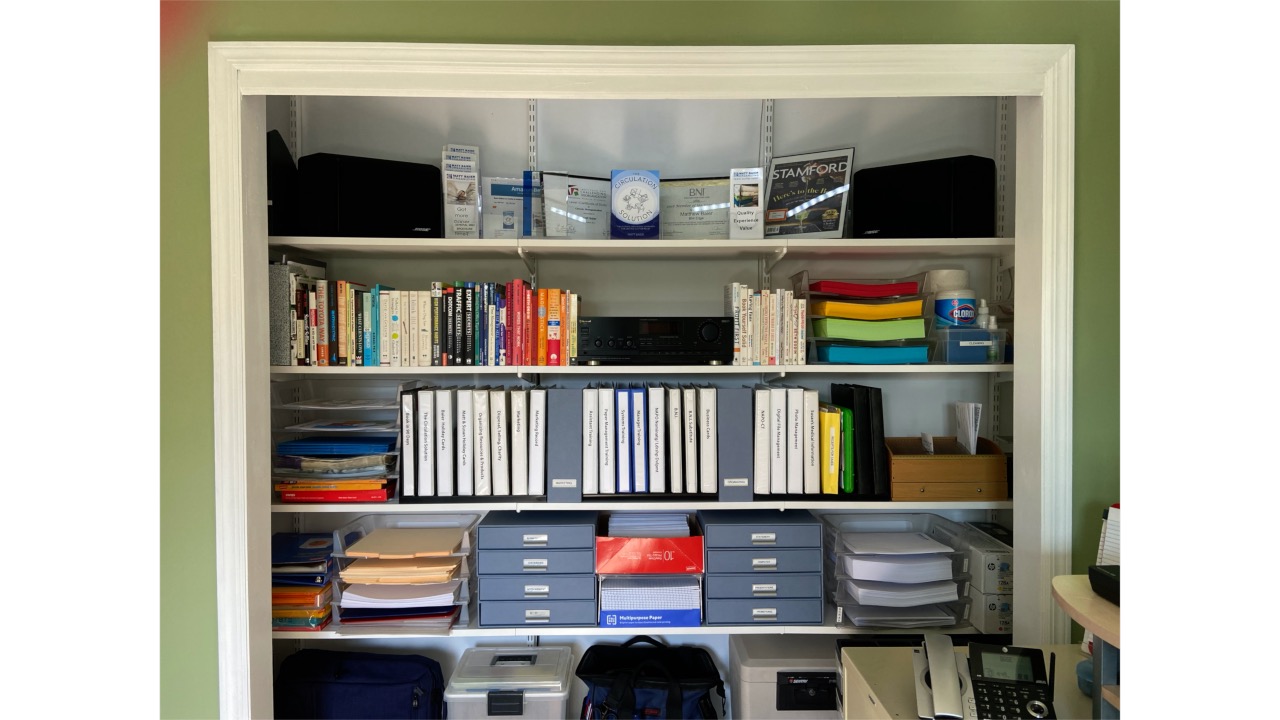
There’s lots of reasons to get organized, so to have a successful journey, first get clear on the destination. In my case, I’ve got a pretty good storage system in my home office. So my priority is to push the visibility even further and go for a cleaner more consistent look. Let’s face it. I need my space to look as much like a professional organizer’s home office as possible.
Step 2: Assess Quantities
I don’t really need to purge much. I did that years ago when I first organized my office supplies, reference, and materials. So I just need to pull everything out and update the quantities in each category. Banker boxes are the best tools for this. Each box represents almost exactly a cubic foot, so you can more easily calculate what will fit on a shelf.
Step 3: Remove Old Structures
I could try selling my old shelves on Facebook Marketplace, but I have limited time and space. I need to get this transformation completed inside a weekend and I don’t have the spare space in my garage to store them. So I’m calling on my friends at The Junkluggers to take them to the Remix Market, where they’ll get a new life. My value on time, space, and progress is greater than any modest financial gain I might get.
Step 4: Install Horizontal Track
With my closet clear, I can begin installation.
A) The single horizontal track is what makes the Elfa shelf installation so easy. Once that goes in securely, everything else just easily falls into place. Use one of the uprights to determine a good height. Mark it, then draw a level line all the way across.
B) Now it’s time to find the studs in the wall, using a stud-finder. Studs show up every 16 inches. So you will need to use a combination of screws for the studs and wall anchors for the hollow wall. You could use all anchors, they give you enough, but I like to use the strength of a stud wherever I can.
C) The Elfa wall anchors are unique, so it is important to understand how they work. As with most wall anchors, they expand behind the wall as you screw them in, to make the installation secure. But what’s unique about these anchors is that they are very soft. This makes it difficult to drive them in with a hammer. So keep the screw inside the anchor to give it some structure. Then just carefully tap it in most of the way and remove the screw.
D) The metal endpiece is not a fancy washer that goes on the outside of the track. It goes behind it and should be tapped the rest of the way in, so that it is flush with the wall. Bring the horizontal cross-track into place with a level, making sure the notches are positioned on the top. Then screw the screws in by hand. When you are happy with how level the cross-track is, you can screw it in all the way.
Step 5: Hang Uprights, Brackets And Shelves
The hard part of your Elfa shelves is done, now for some fun!
Start by hanging the uprights. The kit provides a 24-inch spacer, to keep the spacing even for the shelves that will go on. I like to start with the shelves on the bottom, keeping enough space to fit a vacuum cleaner underneath it. So first the brackets go in, then the shelves, and then the bottom layer is done.
Before I move on to the next layer, I want to share a key step, that you won’t see anywhere else!
Step 6: The Threshing Floor
So what’s a threshing floor? Before the industrial age of farming, farmers would separate the wheat from the chaff on a threshing floor. Wheat wasn’t gathered in baskets until the worthless husks were separated and discarded. In scriptures the threshing floor symbolizes a site of judgement.
So what’s this got to do with Elfa shelves and organizing systems? To work out the arrangement of sizes and categories on the shelves, would be like threshing inside baskets. So give yourself a more spacious “threshing floor”, on your floor, to work out the quantities and shelf heights, before committing items to your shelves.
For example, I have some letter trays I used to stack vertically, but now would like to spread out horizontally. By looking at it in context with the other shelf candidates, I see that they’re the same height as my stacked shoeboxes. This means that all trays can fit on one shelf 14 inches high.
Next step is to determine a good height for that bottom shelf. The higher things will go here and 18 inches is the maximum height I need.
Ideally, the most accessed items should be at or just below eye level, so that’s the next thing to work out.
Another consideration in home offices these days is your background for video calls. So items to display generally make sense at your head level or above. That will include items like books, awards, and decorations.
Step 7: Choose Symmetry
Now that you have used the threshing floor to determine your shelf heights, you can focus more on how things are displayed on those shelves. A great place to start is by looking at symmetry. Besides looking more purposeful and attractive, symmetrical arrangements are more restful on the eye and makes things easier to find. If there is a solid center and balance on each side, then anything beyond that, that doesn’t quite fit visually, is less noticeable.
Step 8: Adjust As Needed
Don’t hope for perfection in the first arrangement, live with it for a while. A big transformation like this will require some adjustments, so try it out and tweak it as needed.
Other Features
There are other features I really like about the Elfa shelves. For starters, they are sturdy. You might think that if the shelves are hanging from one point that they are going to swing around annoyingly. However, the shelf installation secures the swinging uprights. Plus, there is the weight of the items on the shelves that holds it in place. If needed, you can also buy wall clips to keep them completely rigid.
I chose the simple shelves, but there are many options to choose from. This includes drawers of varying heights and styles, closet rods, and work surfaces. There is an Elfa storage solution for every room in your home.
Summary
The Elfa system is my favorite DIY customizable storage system because of:
- The simplicity of installation
- The variety of options
Have you been thinking of installing Elfa shelves and have questions? Ask me how! To actually see how installation works, click on the YouTube link below for a visual demonstration.
If you have used some of the other Elfa shelve options, I’d love to hear about them below!


Leave A Comment